Site Content

August 31, 2012

Test all Baby Boomers for Hepatitis C. Really?

CDC: Boomers need HVC testing

Baby Boomers make up about one-third of the United States population with a startling number of Hepatitis C (HCV) infections. In fact, the Centers for Disease Control and Prevention (CDC) believe that the Baby Boomers, those born between 1945 and 1965, should undergo one-time testing for HCV. Previously, CDC recommended testing only if risk factors such as IV drug use, blood transfusion, or organ transplant existed. Testing for those in healthcare or other high risk occupations (including EMS and nursing) should be tested.

Given that as many as 2 million baby boomers are infected with HCV and many of the 15,000 Americans who will die from the disease are boomers, risk-based screening is no longer enough. According to the CDC -
"...newly available therapies that can cure up to 75 percent of infections, expanded testing – along with linkage to appropriate care and treatment – would prevent the costly consequences of liver cancer and other chronic liver diseases and save more than 120,000 lives." 

  Why are baby boomers at such increased risk for HCV? One theory attributes the increased risk to past behavior, suggesting boomers participated in activities that placed them at risk for HCV. 

HCV can be contracted by occupational exposure. I wonder what the ramifications will be for those baby boomers, who by definition now have increased risk of having HCV, have an undocumented occupational exposure in their past? 


http://www.medscape.com/viewarticle/769361
http://www.cdc.gov/nchhstp/Newsroom/2012/HCV-Testing-Recs-PressRelease.html

August 27, 2012

Has public alerting technology made warning sirens obsolete?

Is hanging on to your siren warning system worth it? Many of the alerting siren systems are aging and becoming difficult if not impossible to maintain and operate. Siren systems have limited ability to do anything more than make noise. They can't tell the public what they need to know in order to take meaningful actions. In other words, for a siren-based alerting system to truly be functional, the public must know ahead of time what the activation means. Is there an storm coming or is there a meltdown at the local nuclear power plant? Is this simply a test activation? The cause may not be that easy to define but the fact remains that the public needs to know the message prior to the activation because the activation will not be able to give that message. We also like to convey  to the public what actions we'd like them to take based on our warnings. Do we want them to shelter in place or evacuate? We'd ideally like to be able to tell them or have them know ahead of time. Not only do communities need to know their role in advance of crisis, they need to pay attention and react to the situation - and the alert or warning.

So far, we've outlined some of the shortcomings of a siren system that a web-based or cellular messaging system might be able to fix.

Back to basics
A warning system has to be able to be get the job done in time of need. It has to be maintained and tested. The public has to be educated on what the alert or warning actually means. These things are universal regardless of the system used. Awareness and alert meaning are usually the result of emergency management public education public education efforts. Engaging the public is key.  A warning system must be able to do a minimum of three things:
  1. Tell the public why its been activated or what hazard is expected
  2. Tell the public what to do and why
  3. Tell the public how long they have to do it
These three simple items are asking a lot for even the best of siren-based systems. Should siren-based alerting systems be discarded in favor of web-based or cellular text alerting systems? Some people would argue that they should. New technology, social media, SMS/cellular messaging systems can solve the problems of awareness, notification, and meaning. New technology can produce real-time alerts, provide updated information on expected actions and hazards. Technology can even help educate the public. 

History lesson
The Control of Electromagnetic Radiation system or CONELRAD was developed in the cold war era and used from 1951 to 1963. As a radio-based system, it focused on key AM radio stations to deliver messages. AM 640 and 1240 were the designated stations. This system  worked because the AM radio was nearly a universal household item. Most automobiles were equipped with an AM radio, too. People were accustomed to getting their news, information, and entertainment from a radio during that time period.

The next generation of CONELRAD came into use around 1963 and functioned as the familiar Emergency Broadcast System or EBS. The familiar tone alert followed by the statement "this is a test - if this had been an actual emergency..." became well known to many in my generation. The EBS was upgraded for peacetime use to include FM radio and television as well as AM frequency.

In 1997 changes in technology made possible the Emergency Alert System. This system was maintained and tested by the FCC, FEMA, and the National Weather Service. One of the cornerstones of this system was that it claimed to be able to deliver a Presidential address to the nation within 10 minutes.

The Integrated Public Alert System (IPAWS) was designated in 2006. FEMA leads this project along with DHS, FCC, and NOAA. Later, in 2007, FEMA established the IPAWS program management office. With IPAWS, FEMA acknowledged new media as a method of message delivery. This system is estimated to be able to reach about 40% of the United States population during the day. Including new media and technology, the IPAWS system could reach the ever-expanding population that recieves a a majority of information from internet based technology.

An interesting note
Nation-wide emergency alerting systems were not used during September 11, 2001. When siren based systems were activated for more recent natural events, they were largely ignored by the public. Although newer technology was tested on a nation-wide basis in November, 2011, it is not clear exactly how successful those tests were.

August 24, 2012

West Nile Virus 2012. Hype or Threat?

 Is West Nile virus 2012 a serious public health concern or matter of media hype? 

The Centers for Disease Control and Prevention (CDC) tell CNN that the recent 2012 West Nile Virus outbreak is the largest ever seen in the United States.  Read CNN: West Nile outbreak largest ever.

Really? Worse by geographical distribution? By total number of cases? Fatalities? Not according to the CDC's Statistics, Surveillance, and Control Archive its not...at least not yet.

West Nile Virus (WNV) has hit the mainstream media in a big way over the last weeks of August, 2012. The virus is being dramatically portrayed as spreading, seemingly out of control, from state to state. As of this publication date, the Centers for Disease Control and Prevention (CDC) is reporting 1,118 human cases of WNV with 41 deaths attributed to the mosquito-borne disease. Going by these (most recent as of posting) numbers, the 2012 WNV situation is actually fairly average when guaged against previous years.  See How does 2012 WNV measure up to past years below.

Is the CDC intentionally contributing to the hype or are we missing something?

CDC categorizes WNV into broad groups; neuroinvasive and non-neuroinvasive disease. In other words, a severe form (neuroinvasive) that produces meningitis or encephalopathy and a less severe form. The 2012 data-to-date demonstrate that 56% of WNV cases are neuroinvasive, with 44% non-neuroinvasive or less severe.

Signs and Symptoms
As many as 80% of people infected with WNV will have no symptoms at all. Few may have mild symptoms resembling other viral illness such as influenza. One out of every 150 people infected with WNV go on to develop severe disease  - high fever, various neurological abnormalities, and weakness that may last several weeks. Neurological effects may be permanent.

How does 2012 measure up to past years? 
2012. An average year for WNV?
Looking back at the CDC data from 2011 to 2006 we find some interesting (albeit less dramatic) numbers. For that six-year period there were a total of 11,708 cases of WNV and 477 fatalities. That's an average of 1,951.3 cases/yr and 79.5 fatalities/yr. making 2012 look like an average year (of the last 6 years) for WNV.

Interestingly, the CDCs archived statistics 2003 would reign supreme as the worst outbreak ever. In 2003 there were 9862 reported cases of WNV and 264 deaths spanning 46 states.


According to the CDC West Nile Virus homepage:
  • People over 50 at higher risk to get severe illness. People over the age of 50 are more likely to develop serious symptoms of WNV if they do get sick and should take special care to avoid mosquito bites. 
  • Being outside means you're at risk. The more time you're outdoors, the more time you could be bitten by an infected mosquito. Pay attention to avoiding mosquito bites if you spend a lot of time outside, either working or playing. 
  • Risk through medical procedures is very low. All donated blood is checked for WNV before being used. The risk of getting WNV through blood transfusions and organ transplants is very small, and should not prevent people who need surgery from having it. If you have concerns, talk to your doctor. 
Vector control. Key to prevention or hazard trade-off?
The main countermeasure against WNV is to kill the mosquito that carries the virus by way of pesticide use. Substances such as malathion and parathion have been used. Both are organophosphate-based chemicals that can produce illness and cause reactions similar to chemical weapon nerve agents at toxic doses. More recently, the pesticide Zenivex has been used. Zenivex E4 is a skin and eye irritant that contains petroleum distillates and poses an aspiration pneumonia hazard. The NFPA rating is Health: 2 Fire: 2 Reactivity: 0. Zenivex has an oral toxicity LD50>5,000 mg/kg and an inhalational toxicity of LC50>2mg/L (4-hour).

August 17, 2012

First-In Actions will dictate outcomes of large vehicle events

Initial Operations at Large Vehicle/School Bus Events

Initial Operations at School Bus Events  are, like those at any other event, are critical to the successful mitigation of the event. We know the actions of the first-due units can make or break any situation; and large profile events will magnify that point. When dealing with an event involving a school bus, mass transit bus, or commercial over the road bus, we have to  remember the physical resources needed may easily overwhelm existing services and carry the potential for surge capacity impact on existing health care systems.

In general, school bus incidents should be treated as multi-patient events or mass casualty incidents. It may be appropriate to consider these events in the same way we look at a target hazard location; sending multiple units and dispatching special call equipment on the initial assignment. Sufficient resources should be sent on the initial assignment based on a jurisdictions Hazard Assessment, rather than waiting for first arriving units. While this may seem contrary to conventional response plans, these events hold high potential for rapid deterioration, need for personnel rotation, additional specialized tools and equipment; and of course, an effective Emergency Incident Rehabilitation program.

Size-up should work in concert with established per-incident plans based on a hazard assessment and include 360-degree assessments on the horizontal and vertical. Bus and large vehicle incidents frequently involve other vehicles. The injury-fatality-rescue ratio will depend on the size of the other vehicle involved. You may wish to consider the other vehicle as a separate event with an entirely separate response and resources.

Triage has to be completed both on the bus/large vehicle and in the crowd. Keep in mind that those able to self-rescue will do so and will scatter into the crowd. Some may even self-refer to area hospitals or home. Accountability for all passengers will be difficult. Although we're accustomed to the priorities of triage and treatment, it must be understood that the first people out of the vehicle may not be the most critically injured...removal of walking wounded or non-injured persons should be done to reduce exposure to further injury and create space to assess and treat others. This also includes removal of deceased.

Keep in mind that there may be persons with special needs on the vehicle. Once these people are removed, they cannot be left unattended.

Bus Rescue: Interior

Front windows may not be an easy exit
For gaining access and ease of evacuation, remember three simple points: Use existing openings, enlarge existing openings, or make your own opening. The example used in this series is a full-size school bus has been turned on its passenger side. The side exits and passenger side windows have been rendered inaccessible leaving the front, rear, and roof as access points.
In Through the Roof we concentrated on gaining access and enlarging existing opening. Exit at the Back of the Bus demonstrated the need to open large areas for extrication. In this installment of Bus Rescue, we'll focus on interior operations that create space for extrication and disentanglement.


Side door access blocked by seats
Above: The side rescue door now sits at the top side of the bus. Access from the exterior can be difficult. Don't forget that access to this door may be difficult from the inside as well. Here we see two seats that will impeded the use of this exit door. These seats can be quickly and easily removed.

Hydraulic tools cut seat posts quickly
Above: Hydraulic cutting tools can be used to quickly remove seats by cutting the posts. Remember to cut the posts as low as possible, close to the floor. Gasoline power generators for hydraulic cutting tool systems must be positioned outside and away from the bus to prevent the introduction of carbon monoxide.

Below: A battery powered saw can accomplish the task of seat post removal. All tools must be well maintained with replacement blades readily available as well as batteries as needed. Hand tools and power hand tools are instrumental for arming additional work teams to speed the seat removal evolution.
hand tools are instrumental for arming additional work teams
Bigger is not always better, some cutting tools are too big for efficient interior operation
Above: Larger hydraulic cutting tools can be used but take more space to operate and may be too cumbersome inside a bus. It may be wise to monitor air quality inside the bus whenever gasoline powered hydraulic tools are used.
Reaching the interior door from the inside may be difficult
Above: Firefighter Lisa Coia-Bubel (City of Rochester Fire Department) demonstrates the difficulty of accessing the side interior door from inside a bus turned on its side. Note seats have been removed allowing for ladder placement into the bus. Roof or straight ladders can be placed into the bus via the side door for quick evacuation of minimally injured occupants.

Below: Further illustration of the side-to-side height created when a school bus it on its side. Note the seats are intact in this view demonstrating additional access limitation. Note also the proximity and size of the roof hatches (now side hatches). Intact seats will make placement of ladders difficult.
Height of side door and intact seats create difficult extrication
Above and below: Hand tools can be used to remove seats and some interior bus components when power/hydraulic tools are not appropriate.


Manage the "MCI in a can" with these five suggestions

Five tips for managing Passenger Transportation Accidents

1. Planning: Situational Awareness is important for all levels of the response community. Knowing your response area and the types of hazards therein is the first step. Pre-incident planning is also a necessity and must involve surrounding agencies. Don't forget to include the non-traditional responders and the health care system in your area in your pre-incident panning and training. Perhaps a best first step is to remember that it CAN happen here.

2. Responding: The actions of the first-in crews will dictate the outcome of the event. I recommend that everyone know where they're going, do something smart with your apparatus, and keep in mind there are events when it is better to not just do something...but stand there. LOCATE (Location, Obstacles, Conditions, Accessories, Treatment, Extra help) works for transpiration accidents as well as single patient response.

3. Managing the scene and incident command: The first suggestion...ask yourself how bad can this get? Then ask; Are we ready for this bus crash? Incident manages, rescue and triage branch leaders need to consider a few immediate actions when working at a passenger transportation accident: the injury/fatality ratio, understand where people (and kids) like to sit while riding buses, and that existing openings (doors and windows) may not be accessible.


4. Emergency Incident Rehabilitation: This may be the most important part of planning, responding and managing any event. Effective rehab helps to keep your personnel safe and working. We should be trying to run a good rehab at every incident. Use my  5 LEVEL Steps to Proper Incident Rehab and use these 4 points to make your Emergency Incident Rehab Functional.

5. Know general bus types and construction: You have to be able to get in and get out of the bus. A general working knowlege of school bus construction features is a tremendous benefit. Don't worry about getting too detailed...just understand the basics of construction and types of school buses.
Doing so will help improve planning, response and management.

EMS considerations for School Bus Rescue

A majority of passengers will be minimally injured after a school bus crash. Utilization of proper access/egress, triage and treatment procedures will improve the EMS response to these high stress events.

School Bus Rescue: Exit at the Rear of the Bus

When existing opening aren't enough...enlarge the opening for efficient extrication of victims.

Above: Firefighters assess access and begin dismantling rear door.
For gaining access and ease of evacuation, remember three simple points: Use existing openings, enlarge existing openings, or make your own opening.

In this installment we consider access and removal of the rear door. We'll focus on enlargement of existing openings and creating your own opening.

As seen in Through the Roof, this full-size school bus has been turned on its passenger side. The side exits and passenger side windows have been rendered inaccessible leaving the front, rear, and roof as access points. In Through the Roof, we looked at operations to enlarge roof hatch openings to improve access and rescue. This post will focus on access, opening, and enlargement of the rear door.  In our next installment, we'll focus on interior operations for disentanglement and access. 

Keep in mind that school bus accidents of this magnitude are rare, but when they do occur there is almost certainly going to be significant injuries, need for disentanglement, and protracted operational periods.  Successful management of incidents such as these require solid performance of the first in units. A significant knowledge of scene size up and vehicle construction are also vital. The 7 basic bus rescue points will aid any responder in the setting of a large vehicle/school bus event.

Below: Most rear doors are hinged to swing open towards the passenger side. In this situation the door does not hamper egress. Most doors lack a hold-open device, meaning if the bus were on the drivers side, the door would need to be supported in the open position or removed to keep it from obstructing operations. In either event, keep in mind there are seats directly forward of the door that do impede the use of this space as an exit. Those seats will need to be removed (as seen in following) in order to maximize extrication space.

Note height of door from road level.


Interior latch assembly can be removed with wrenches or socket set
Above: This view demonstrates the robust latching system and bolt throw (receiver removed). The entire latch assembly can be removed with hand tools (wrench/socket) from the inside; thus freeing the door.

Below: Traditional forcible entry tools and techniques may not be successful on the rear door of a school bus.  
Forcible entry tools and techniques may not be successful on rear doors

Use of a power saw to remove door hinge
Above: A battery powered saw can be used to cut away the door hinge and completely remove the door. The evolution can be completed fairly quickly with a well maintained saw and replacement blades.

Below: Once the door and glass from rear windows are removed, a cutting tool can be used to remove the door/widow frame and create and enlarged opening. Again, this can be accomplished quickly with well maintained equipment and skilled firefighters.

Hydraulic cutters remove frame between rear widows and door


Door/window frame removed. Note edge protection in place.
Above: Door/window frame removed providing greatly improved access. Note seat removal operation taking place adjacent to rear of bus. In combination, these two evolutions provide greater access/egress and facilitate removal of immobilized victims.

Below: Door removed and opening enlarged. Note the added space created by removal of rear seats. This creates an opening that allows for safe, efficient movement of immobilized patients.

Added space created by removal of door and rear seats. Note tape used to protect edges.

Bus Rescue: gaining access through the roof

Bus on the side is rare and challenging. Injuries are almost certain.
For gaining access and ease of evacuation, remember three simple points: Use existing openings, enlarge existing openings, or make your own opening.

Using existing openings will work well if patients can walk or have limited injuries and is the fastest and easiest to accomplish. In the pictured here, the bus is turned on the passenger side, rendering the passenger door, side and window exits unusable. In this scenario your best choice may be to use the rear door exit. Removal of the front windshield may also facilitate movement out via the front of the bus.

When existing opening aren't enough, enlarging existing openings is your next step. Enlarging openings such as roof hatches takes some time, personnel and equipment, but allows for rapid movement of rescuers and gear in and patients out. Once you start to cut on a bus be sure to reevaluate the need for structural stability and any effect on vehicle stabilization.

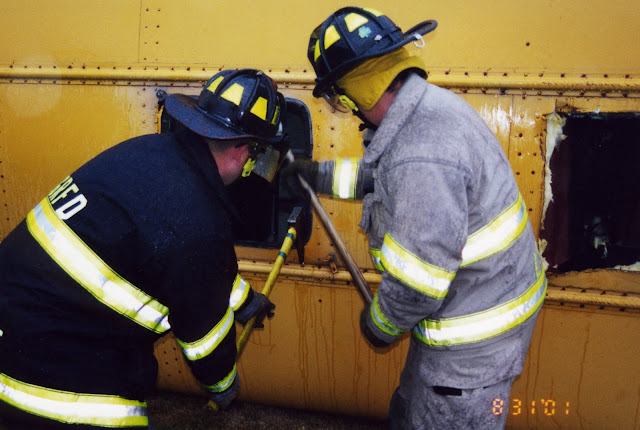
Firefighters use hand tools to augment power tools in this evolution

Above: Two properly protected firefighters use hand tools to cut the roof outer skin. Its important to rely on hand tools as a back up to hydraulic or battery powered cutting tools. Hand tools can also be affective for arming multiple teams when power tools are in short supply.

Below: The roof hatch opening enlarged (hatch removed) to facilitate movement of a backboard or rescue basket and personnel in and out of the bus. Note the jagged sheet metal. These hazards must be covered. Sharp edges will be present in the interior of the bus as well as a result of cutting the interior skin.


Note the inner and outer skin and the presence of structural hoops

Above: Marked by black arrow - Note the sharp edges on the outer skin (yellow) and the presence of the inner skin (red). Both will need to be removed and edges covered to prevent mechanical injury. FF John Harnischfeger (Ridge Road Fire District) points out a support hoop that has been cut to enlarge the opening. Hoop locations can be determined by the sequential line of rivets. Although these hoops can be cut, caution must be used as the structural integrity of the bus may be compromised. 

Below: A triangle cut made towards the rear of the bus facilitates interior extrication/disentanglement and removal. Caution must be taken to remove any victims from that area prior to beginning cutting operations.  Note the intact roof hatch to the right.

Gaining access no matter what side the roof is on.

Up Next: School Bus - Exit at the Rear of the Bus

School Bus Types

A general review of construction types and features of school buses

A news report posted by MSNBC.com about a "church" bus crash reminds us of the severity and hazards posed by incidents involving school buses. According to MSNBC, there were 29 people involved in this event, 23 were children. According to the report, the crash may have been caused by driver over correction causing the bus to overturn onto its side and resulted in nine injuries.

Lets do a quick overview of buses and some quick tips that you can use today.

Types of buses
Various Type A and B vehicle
Type A and B - described as van-style vehicles, are usually small van conversions with a gross weight around 10,000 pounds. Type A vehicles may carry 8-12 passengers with the main door behind the passenger side front tire. Type B vehicles may carry slightly more with a capacity of 16-24 passengers. The door is in the same configuration as the type A. In the setting of type A/B van-style vehicles, don't be complacent; these vehicles are a measure of quality versus quantity. The van-style buses are often used for transportation of special needs populations adding an entirely different medical, emotional, and evacuation element to the situation. These vehicles may also include special ramps, lifts and restraint devices...you'll need to be familiar with these items to be effective in your rescue efforts.

Wide range of type C/D buses
Type C and D vehicles are the larger buses that you normal see used as school buses or other transportation uses. Type C vehicles have a capacity of 30-70, also with the front door behind the front wheel. Type A/B/C buses have a rear exit door and may have a side exit as well. Type D buses are those with the flat front and the engine in the rear. They have a capacity of 40-120 passengers. The rear exit is an escape widow above the rear engine.

Use of Exits
Keep in mind that the bottom of rear and side exit doors are about four-feet above the ground. Side escape windows can be six feet off the ground and open upward...with no "hold open" device.

Command and Control
These events will be challenging. Multiple agencies and responders, media, traffic and the environment will all play a role in your bus event. Add to that the fact that many school-aged kids have cellular phones...you'll have frantic family members on scene with, or perhaps a head, of you. Don't ever forget the probability your actions will be recorded, too. 

Bus Rescue points you can use now

 7 take-home recommendations when dealing with any large passenger vehicle collision. 

  • Knowing the construction and type of bus or large vehicle involved can be your first clue to the potential severity of the incident. Type A and B buses are the converted van style while Type C and D are the classic school bus types. Size-up must include the type of bus, number of occupants, and the position of the bus. Experience has shown that most collisions involving school buses result in little damage to the bus and the bus remaining upright. 
  • Remaining on all four tires is not a guarantee of no injuries inside, while finding a school bus in any other position almost certainly predicts a variety of injury patterns. This is a good time to remind everyone that there may (most likely will) be injuries in any passenger vehicle that has collided with the bus. 
  • Your size-up must include factors such as traffic conditions and environmental conditions. These contingencies will impact rescue efforts as well as treatment, triage and transport as well as longevity of responders.
  • You should plan for distractions. Anticipate the media will have been contacted and will show up as well as parents. Plan for their arrival. Consider that patients may have walked off the scene prior to your arrival as well. 
  • Control the hazards simultaneously with stabilizing the vehicle is a priority. Shutting off the electrical master switch and ignition as soon as possible may be your best bet. If you need to disconnect the battery, remember two things; there may be more than one battery and disconnect the negative cable. It is not uncommon for buses to have multiple batteries in different locations. Removing the negative cable and securing it to prevent contact with other parts of the bus is a good safety tip. 
  • Solid stabilization has to be done at either end of the bus or under the center frame rails. Never attempt to crib a school bus under the skirting on the sides. Keep in mind that you'll need more cribbing than usual. Simply choking the wheels may be sufficient if the vehicle is upright; otherwise, the situation will dictate where best to crib and stabilize the bus. 
  • For gaining access and creating evacuation , follow three simple steps points: Use existing opening, enlarge existing openings, or make your own opening. First, using existing openings will work well if patients can walk or have limited injuries and is the fastest and easiest to accomplish. Enlarging existing openings such as windows takes some time, personnel and equipment, but allows for rapid movement of rescuers and gear in and patients out. Once you start to cut on a bus be sure to reevaluate the need for structural stabilization and any effect on vehicle stabilization. You can make your own openings, too. I would leave this tactic as a last resort. Cutting into the side or top of a school bus is personnel intensive, time consuming and can add to the hazards. Cutting into the bottom of a bus is doable, but next to impossible.